
Learn how to make room on your Mac without having to delete your favorite apps or software.
Since the launch of macOS Sierra in 2017, the Mac cleaning process has become simpler. We advise you to update your computer, then follow this tutorial in which we explain how to make room on your Mac and recover disk space.
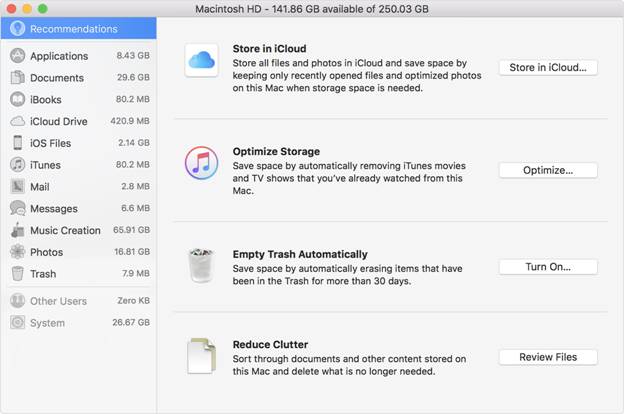
1) Manage storage space
Apple developed an e storage management functionality to delete your old files and transfer your data to the cloud.
- To access it, click on the Apple icon at the top left of your screen and choose about this Mac.
- Then, click the Storage tab.
- In the window that appears, it will show the amount of space occupied by MacOS and your applications.
- Click on Manage right, a menu opens with the options Store in iCloud, Optimize Storage, Empty Recycle Bin Automatically and Reduce Congestion.
- On the left, you will see the amount of data contained in iTunes, your Recycle Bin, in Documents, Mail, Photos, etc. Click on it will get detailed information about all the recorded files.
- Click Recommendations to return to the list of previously given options. To understand what each is for, read on.
2) Optimize storage space
Optimize storage allows you to delete movies and TV shows that you have already viewed, as well as attachments of your emails.
- These will not be permanently lost because they will be saved automatically on iCloud.
- The videos can be downloaded again from iTunes for free.
- Just click Optimize and your Mac does the rest.
3) Empty the Recycle Bin Automatically
Empty Recycle Bin automatically loads as its name implies to systematically erase, after a period of 30 days, all documents that are in the Recycle Bin.
So you have time to recover a file before it is deleted. To use this feature, click Enable.
4) Reduce clutter
Reduce clutter will scan your Mac to locate and erase older large files.
Click Browse Files, then in the left panel select the desired category, then click on the cross.
Read : 6 Reasons Why You Should Install a Phone Cleaner App
5) Store in iCloud
The iCloud cloud storage service offers each holder of an Apple account 5 GB of free space.
To increase it, Apple offers a subscription (0.99 $ / month for 50 GB, 2.99 $ / month for 200 GB and 9.99 $ / month for 2 TB).
- To save your data to iCloud, click Store in iCloud and enter your password.
- ICloud Photo Library is used to sync photos from your Mac to all your iOS devices and vice versa. The problem is that your Mac can very quickly get cluttered with these photos.
- To prevent this, go to the Photos → Preferences → iCloud tab, and select the iCloud Photo Library and Optimize Mac Storage checkboxes.
- In this way, the originals of your photos will not be saved on your but in the cloud.
- If you decide to remove them from your computer, they will be accessible from iCloud, your iPhone and your iPad.
- To transfer your library to an external hard drive, exit the Photos application and copy your Photo Library by holding down the Cmd key. So these will be copied and erased from your Mac.
At the end of this transfer, open the Photos app by holding down the Option (alt) key. In the application, click Photos → Preferences → General and select Use as a system library.
6) iPhoto and Aperture
If you were once a user of Aperture or iPhoto applications and you migrated to the Photo application, you may have 3 image libraries in total.
If you’re not going to use Aperture and iPhoto anymore, then we recommend copying their content to a cloud or external hard drive and then deleting it from your Mac.
To access your original photos, go to Images, select iPhoto Library. Right-click and select Show Package Contents.
Your iPhoto are in the Master’s directory or Originals (for older versions), you just have to Export them.
7) iTunes Library
To free up some space on your Mac, look also at iTunes. You can save your library to an external drive or use Apple’s AirPort Time Capsule. With the latter, access your favorite songs as soon as you are connected to the local network.
To avoid overloading your Mac with music, why not subscribe to Apple Music? Listen to more than 40 million titles, the individual subscription is 9.99 $ / month and the first three months are free.
Otherwise, there is the iTunes Match service (25 $ / year) where only an internet connection is required to access your own library and the Apple Music catalog from all your iOS devices.
![]()
8) The Downloads folder
Your Downloads folder surely contains files you no longer need (PDF documents, images, zip files).
For example, if you have disk images whose contents have already been installed, then they are no longer useful. We suggest you delete them.
You May Like to Know : How to install WordPress on Amazon Web Services?
9) The gourmet apps
To lighten up your Mac, even more, find and remove space-hungry applications and their preference files. For that, do not hesitate to help you with our detailed tutorial.
- To locate files that take up space, open a new Finder window and simultaneously press the Shift (below Shift), Cmd and H.
- Then, press the Cmd and F keys. At the top of the new window, click Type and select other, at the very bottom.
- Scroll down to the File Size list and check its box.
- Otherwise, enter File Size in the search bar at the top right.
Now, to the right of File Size, select is greater than and the MB unit.
Enter the desired size, 100 MB for example, so all files larger than 100 MB will appear on the screen. All you have to do is copy them to an external drive or delete them permanently.
10) Duplicates
Duplicate duplication can also save space, for this, there is the Gemini 2 program (free trial version, then from 19.95 $).
To avoid duplicates on iTunes, open the app, go to Preferences → Advanced, and uncheck Copy files to the iTunes Media folder.
11) Quit apps in the background
Leaving apps that stay open for several days or restarting your Mac regularly also frees up space. Indeed, applications create temporary files to save data.
The longer they stay active, the larger the size of their files.
Do not forget to close unused apps and restart your computer.
12) Cloud services
Cloud storage services are the most convenient way to avoid overloading your computer’s memory and accessing your documents anywhere and from any device.
If you have a Dropbox or OneDrive account, these two clouds automatically synchronize your data.
Be aware that Office 365 users get 1TB of free storage, the same capacity with Dropbox costs $ 9.99 per month.
To stop the Dropbox automatic synchronization, open the application, in the menu bar, on the Gear wheel and then on Preferences.
Then click on the Account tab and change the settings. All you have to do is uncheck the files and folders you do not want to sync on your Mac anymore.
For OneDrive users, open the application, in the menu bar select Preferences. Click Choose Folders, and then click the files to stop synchronizing.